Настройка vlm в vlc
Включается строчкой в конфиге: application = vlc
Работает только в WTware для x86 и только с video=. (U) . Никак нельзя запустить VLC, если video=. (F) или video=. (X) . Если на вашей машине с 1024Мб памяти не запускается ни один драйвер видео из набора (U) , пишите, будем чинить.
В UEFI сборке WTware и в WTware для Raspberry Pi VLC еще не сделан.
Самый простой пример
Чтобы просто запустить VLC и увидеть, что оно работает, напишите в конфигурационный файл три строки:
C таким конфигурационным файлом на экране появится оранжево-зеленая картинка с текстом «VLC for WTware test screen.» Что означает каждая из строк конфигурационного файла:
Включает проигрыватель VLC вместо обычного RDP клиента.
Указывает терминалу скачать файл vlc.jpg из каталога VLC на TFTP или HTTP сервере (скорее всего, полный путь C:\ProgramData\WTware\VLC ). Файл будет скачан в память терминала и доступен как /vlc_files/vlc.jpg
Указывает проигрывателю VLC открыть файл //vlc_files/vlc.jpg , а волшебое слово —image-duration=-1 указывает бесконечно долго показывать картинку.
VLC и виртуальные экраны
Проигрыватель VLC можно поместить на второй виртуальный экран. Подробно про виртуальные экраны написано в документации. Пример конфигурационного файла, в котором на первом виртуальном экране подключение к RDP серверу 192.168.1.1, а на втором проигрыватель VLC с тестовой картинкой. Переключаться между экранами клавишами Win-1..Win-2, Win-стрелки или через всплывающее меню внизу справа:
Видео из памяти терминала
Картинка это еще не видео. Не интересно. Можно записать видеофайл в каталог VLC и указать его имя вместо vlc.jpg в параметрах vlc_files= и vlc_cmdline= . Тогда проигрыватель VLC будет воспроизводить видео. Файлы, указаные в параметре vlc_files= , будут загружены в оперативную память терминала при загрузке. Не стоит указывать файлы размером в гигабайты: будет загружаться долго и оперативной памяти может не хватить. Файлы загружаются быстрее, если настроить загрузку по HTTP.
Для бесконечного повтора видео в параметре vlc_cmdline нужно убрать волшебное слово —image-duration=-1 и добавить другое волшебное слово —loop . Пример:
RTSP вещание, настройка источника видео
VLC умеет принимать вещание по протоколу RTSP. Этот протокол используют камеры видеонаблюдения, и WTware можно настроить принимать картинку с камер. Или же можно настроить вещание видеопотока в сеть с Linux-машины и показывать одинаковое, синхронное видео на нескольких терминалах с WTware.
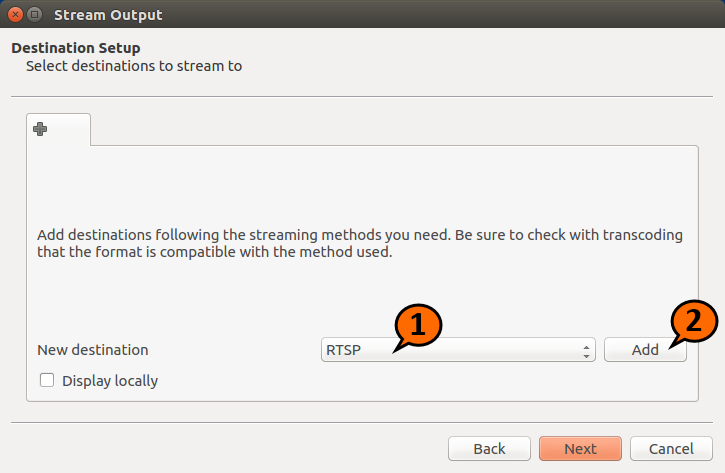
В качестве источника RTSP вещания нужна именно Linux машина, с Windows получается плохо. Возьмите любой свежий Linux. Live USB в виртуальной машине вполне подойдет. Ниже будут скриншоты запуска вещания, снятые с Ubuntu Linux. На скриншотах входящий в дистрибутив Ubuntu VLC. Ничего сложного:


RTSP вещание, настройка терминала
Конфигурационный файл терминала, принимающего вещание RTSP:
Вместо 10.1.1.32 надо указать IP машины с Linux, на которой запущено вещание. Так, как нарисовано на скриншотах выше. Порт 8554 и путь /test указаны на скриншотах. На экране терминала должно появиться видео. Можно запустить несколько терминалов с одинаковыми настройками, и все они будут покзывать одинаковое видео, которое вещается по RTSP с Linux машины.
Принимать вещание с камеры видеонаблюдения точно так же, порт и путь надо взять из настроек камеры.
Конфигурационный файл VLM
Сложную настройку проигрывателя VLC удобнее выполнять через специальный конфигурационный файл VLM. Сначала самый простой пример, VLM для картинки. Записываем этот текст в файл test1.txt в каталоге VLC:
В конфигурационном файле WTware пишем:
На экране должна получиться картинка с текстом «VLC for WTware test screen.»
Мозаика. Четыре вещания на экране
Более сложный пример настройки проигрывателя VLC с помощью конфигурационного файла VLM. Сначала надо запустить вещание видео в сеть на машине с Linux так, как выше было нарисовано на скриншотах. Затем записываем текст в файл test2.txt в каталоге VLC , заменяя 10.1.1.20 на IP вашей машины с линуксом:
В конфигурационный файл WTware пишем следующие строки. Обратите внимание: всё, что следует после vlc_cmdline= это одна длинная строка:
Должна получиться такая картинка:

Четыре рыбы в четыре раза лучше одной рыбы! Можно указать разные источники видео, например с разных камер видеонаблюдения.
Про размеры. Мозаика работает так: сначала масштабируются видеопотоки, их размеры становятся равными указанным в width= и height= в конструкции #mosaic-bridge<> . Затем потоки накладываются на фоновую картинку. И после этого фоновая картинка с видеопотоками растягивается на весь экран терминала. Чтобы не запутаться, надо вместо нашей картинки vlc.jpg использовать фоновую картинку того же размера, что и физическое разрешение монитора на терминале, и в width= и height= внутри конструкции mosaic<> указывать размер этой картинки.
Промышленная эксплуатация
Два монитора 1920×1080 по девять камер видеонаблюдения с форума WTware:

Таймаут отключения VLC
По умолчанию WTware включает проигрыватель VLC только после того, как пользователь переключится на соответствующий виртуальный экран. И выключает, когда пользователь переключается на другой экран. Это позволяет не загружать процессор и сеть воспроизведением видео, когда VLC работает в фоне. Но при сетевом вещании видео картинка полностью прорисовывается через несколько секунд после запуска VLC. Неудобно, если переключать экраны приходится часто. Такая строка в конфигурационном файле WTware:
указывает терминалу не выключать VLC 30 секунд после того, как пользователь переключится на другой экран, на котором может работать RDP клиент. Это позволит, например, быстро сделать запись в базе и, переключившись обратно на видеонаблюдение, сразу без задержек видеть все камеры. Возможные значения — от 0 (значение по умолчанию) до 300 (5 минут работы VLC в фоновом режиме). Можно запретить терминалу отключать проигрыватель VLC:
Интерфейс VLC
Для тех, кто понимает. Такие строки в конфигурационном файле:
запустят VLC с интерфейсом. Пользоваться им неудобно, зато можно зайти в настройки проигрывателя или посмотреть список установленных плагинов.
Источник
Documentation:Streaming HowTo/VLM
 | This page is outdated and information might be incorrect. Create an account to start editing, and then click here to update this article. |
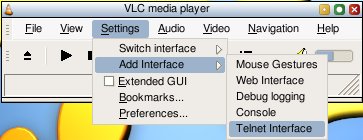
ContentsVideoLAN Manager is a small media manager designed to control multiple streams with only one instance of VLC. It allows multiple streaming and video on demand (VoD). This manager being a new feature, it can only be controlled by the telnet interface or the http interface. InterfacesTelnet interfaceYou can launch the telnet interface as a common interface using the command line: The telnet interface can also be launched in the wxWindows interface: The default port is 4212. The default password is «admin». These can be changed using —telnet-port and —telnet-password command line options. They can also be changed in the preferences panel when using the wxWindows interface in the Modules->interface->telnet section (check the Advanced options checkbox). HTTP interfaceLaunching the HTTP interface is described in Control_VLC_via_a_browser To access the vlm section of the http interface, use the following URL: http://host:port/vlm.html (http://host:port/vlm/ for VLC 0.8.4 and older). Note: People who aren’t used to command line streaming with VLC but want to use VLM’s features are advised to use the HTTP interface. VLM ElementsMediasA Media is composed with a list of inputs (the video and audio streams you want to stream), an output (how and where you want to stream them) and some options. There are two types of medias:
SchedulesA Schedule is a script with a date. When the schedule date is reached, the script is launched. There are several options available like a period or a number of repetitions. Command line syntaxCommand lines
Media PropertiesNote: Except the «append» property, all properties can be followed by another one.
Schedule Properties
Control Commands
Configuration FilesA VLM configuration file is a list of command lines : one line corresponds to one command line. To create a configuration file, just edit a text file and type a list of VLM commands. Beware of recursive calls: you can put a load (file) in a configuration file which can lead to recursive inclusion of the same file and result in VLC’s crash. You can automatically load a VLM configuration when launching VLC with the —vlm-conf command line option. The minimal command to make that work is: As of versions > 0.8.1, any line where the first non whitespace character is a # is considered as a comment. ExamplesThis section provides several small vlm configuration files. Multiple streamsSimple broadcasting
Scheduled broadcastingVideo On DemandBasic exampleFirst launch the vlc
Then you connect to the vlc telnet interface and create the vod object. You can connect to vlc telnet interface by use the terminal. and create the vod object. You can access to the stream with:
Advanced exampleYou can also specify options, a muxer, or an additional output chain that will be prepended to the RTP output used by VoD (e.g. to enable transcoding). Note: make sure to enter the corresponding commands before the VoD media is enabled, or before you setup the input. Источник ➤ Adblockdetector |
